Back
Technical Guide: How to get a Google Knowledge Panel
DIY Google Knowledge Panel Guide

Having a personal Google Knowledge Panel – the information box that appears on the right side of search results for a name – can greatly enhance your online presence. It serves as a verified badge of credibility and a quick summary of who you are.
While we offer a DFY (Done-For-You) service for clients who cannot spend the 100+ hours that creating a panel might take, we believe that the core knowledge of how to secure one should be accessible to everyone, minus, of course, a little bit of our "secret sauce."
Contrary to popular belief, you don’t have to be a celebrity or Fortune 500 CEO to earn one; any individual or brand can get a Knowledge Panel if Google can confidently recognize you as a distinct entity.
This comprehensive guide walks you through the steps to establish yourself as an entity in Google’s Knowledge Graph and trigger a personal Knowledge Panel.
Table of Contents
What is a Google Knowledge Panel and Why It Matters
Step 1: Establish Your “Home” Entity (Official Website)
Step 2: Implement JSON-LD Schema Markup (Person or Organization)
Step 3: Build Authoritative Online Profiles (“Parasite” Platforms)
Step 4: Ensure Consistency Across the Web
Step 5: Link and Interlink All Your Profiles
Step 6: Boost Credibility with Press and Coverage
Step 7: Monitor Google’s Knowledge Graph Presence
Step 8: Claim and Manage Your Knowledge Panel
Maintaining Your Knowledge Panel Long-Term
What is a Google Knowledge Panel and Why It Matters
A Google Knowledge Panel is an information box that provides an at-a-glance overview of a person, brand, or entity. For individuals, it usually shows your name, photo, brief bio or descriptor, and key facts (profession, birthdate, etc.), along with links to your website and social profiles.
This panel signals that Google “understands” who you are, it has enough reliable information to confidently present a unified profile of your identity. In practical terms, a Knowledge Panel boosts your credibility and visibility: it’s like a 24/7 digital business card that instantly communicates your legitimacy and highlights your achievements.
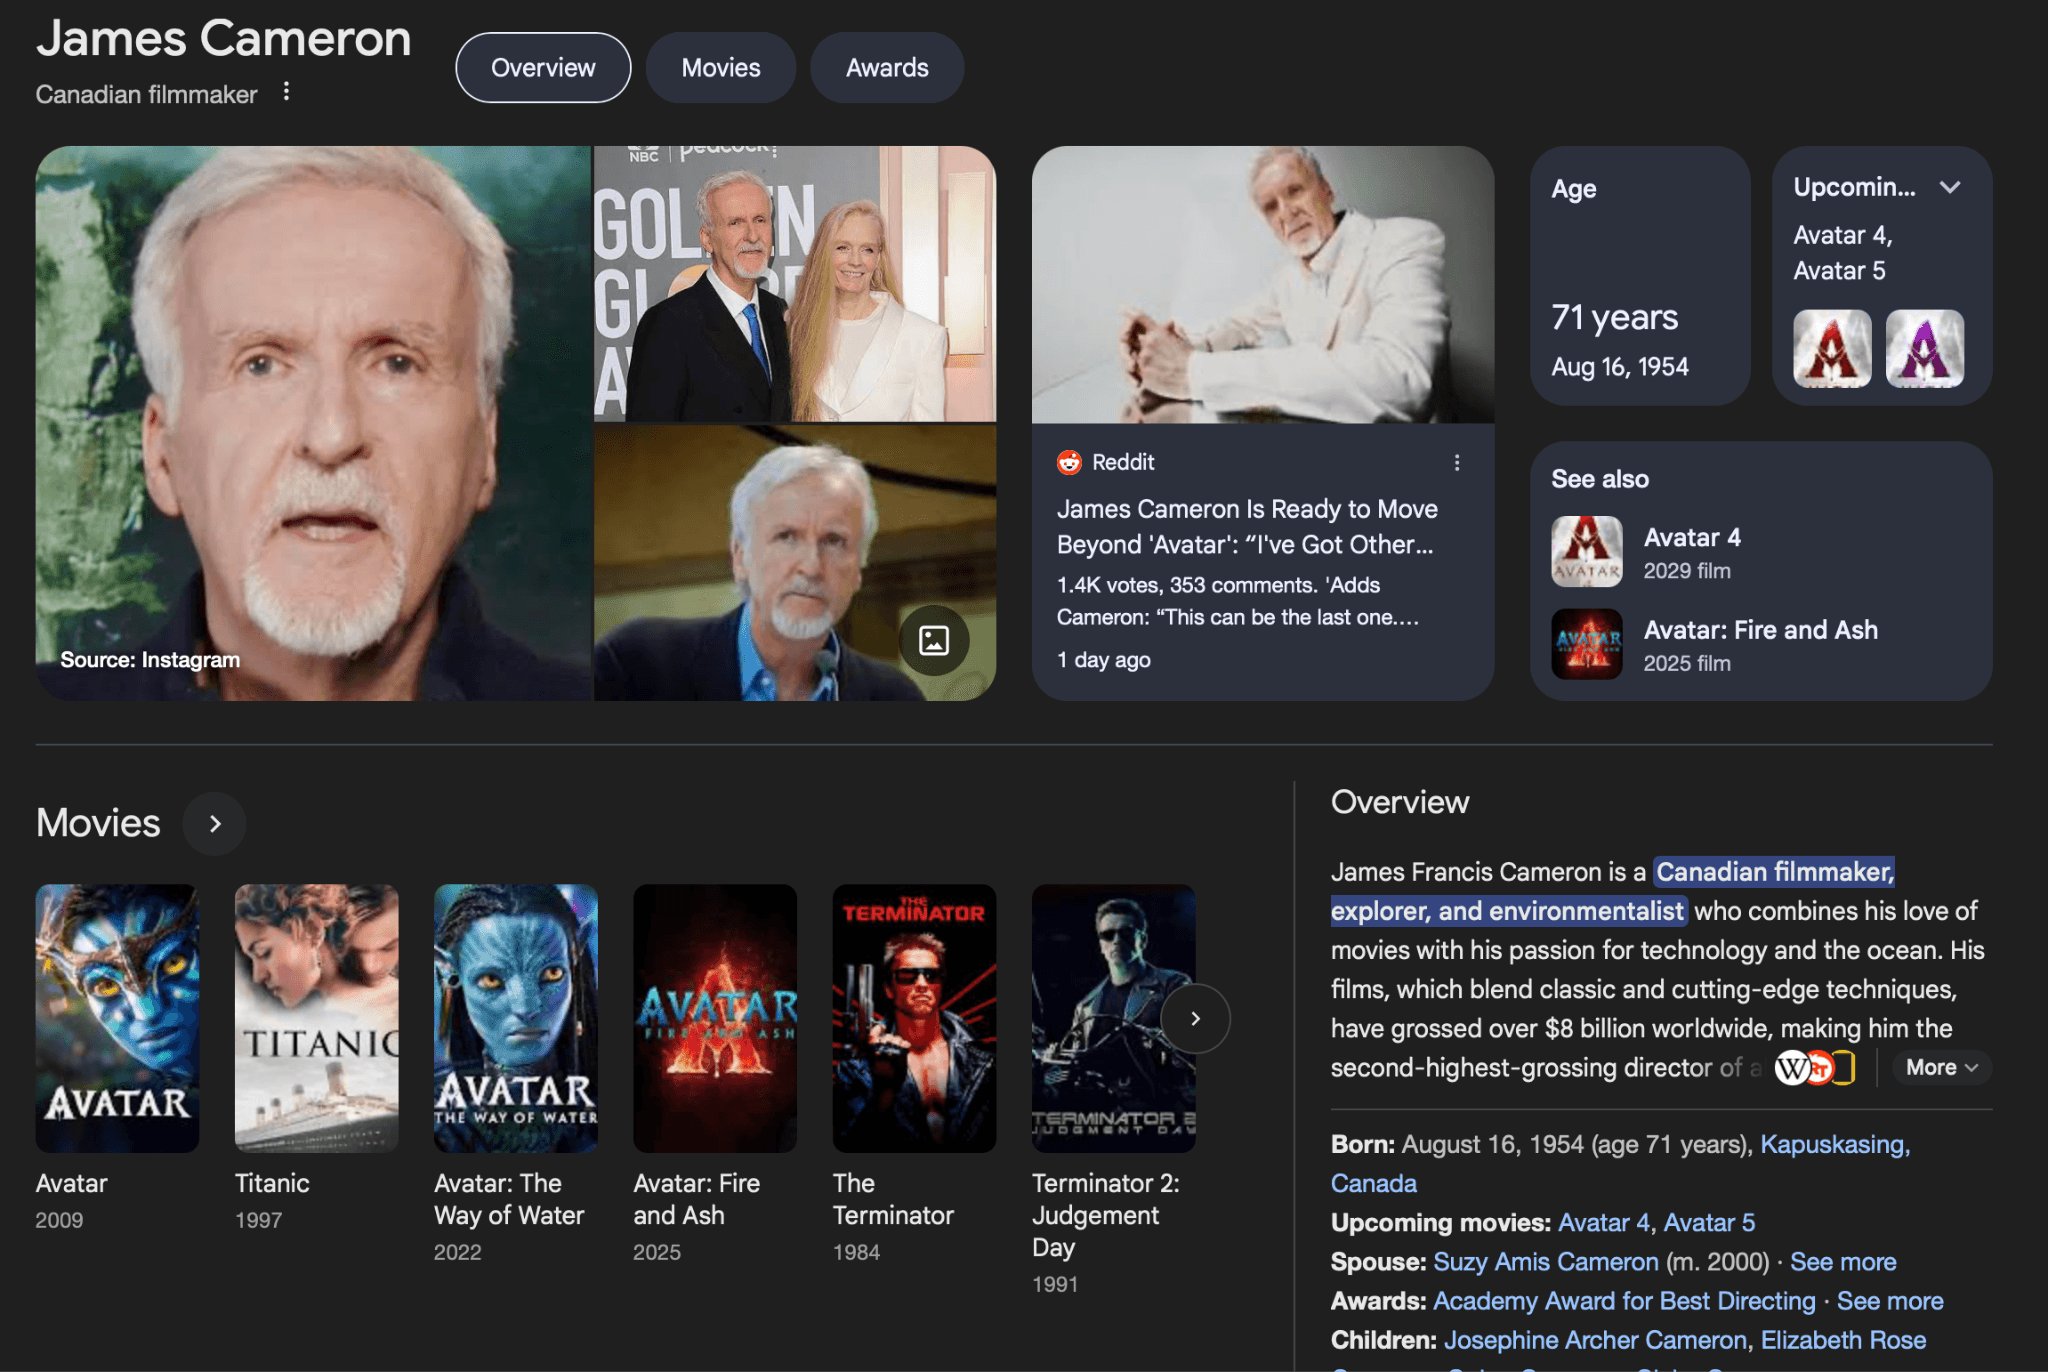
Importantly, you do not need to be “famous” to get a Knowledge Panel. Google’s goal is not to reward popularity, but to build a vast map of entities and how they relate. “Every person, business, or organization is a potential entity, if you give Google enough structured proof,” as one expert puts it.
In other words, Google will create a Knowledge Panel when it can confidently distinguish who you are and see enough evidence to answer people’s searches about you. Even relatively unknown individuals in niche industries have panels once Google is certain about their identity and has consolidated facts from trustworthy sources. The process of “teaching” Google who you are is what we’ll focus on.
Step 1: Establish Your “Home” Entity (Official Website)
The first step is to create your home base on the web – a dedicated page all about you on a domain you control (often your personal website or a detailed “About Me” page). This page will serve as your “Entity Home”, aggregating all the fundamental information about you in one place. Think of it as the authoritative source that Google can reference for facts about your identity.
On this page, clearly provide key details such as:
Full Name (and any common nicknames or variations)
Who You Are / What You Do – e.g. your profession or role (Entrepreneur, Author, Executive, etc.)
Bio or Description – a concise overview of your career or accomplishments
Date of Birth and Age (if you’re willing to share)
Nationality / Location – where you are based or from
Education (if notable) and Awards or Honors you’ve received
Current Company or Organization (if applicable, as founder/CEO or employee)
Notable Works (books published, projects, products, etc.)
Contact info (business email, public social media handles)
Official Website URL (if this page isn’t the main site) and Social Media Links
Ensure this information is accurate and up-to-date, as this page is the cornerstone of your online identity. It should read like a Wikipedia-style summary of you or your business, but in your own controlled space. By creating this comprehensive profile page, you give Google a one-stop reference to understand who you are, what you do, and why you’re notable.
Step 2: Implement JSON-LD Schema Markup (Person or Organization)
Once your entity home page is ready, add structured data (Schema.org markup in JSON-LD format) to it. Structured data is code that explicitly labels each piece of information for search engines, speaking to Google in its own language. This is critical for helping Google’s Knowledge Graph identify your “entity” and connect it with facts across the web.
Use the appropriate schema type:
For an individual person, use Person schema.
For a personal brand or a company, use Organization (or a more specific subtype like LocalBusiness if applicable).
In your JSON-LD, include all the key details from your page as properties. At minimum, define:
@context and @type: (e.g. "@context": "https://schema.org", "@type": "Person").
@id: A unique identifier URL for your entity. Commonly, you can use your website or about page URL with a hash, e.g. "@id": "https://yourwebsite.com/about#person".
Name: Your full name ("name": "John Doe").
Description: A brief description or tagline.
Job Title / Role: e.g. "jobTitle": "Founder & CEO, XYZ Company".
Affiliation / Works For: Your company or organization, with a URL if possible ("worksFor": "https://xyzcompany.com").
Alma Mater: Education institutions, if notable ("alumniOf": {...}).
Birthdate: (If available, use birthDate in ISO format).
Image: A URL to your headshot or logo ("image": "https://yourwebsite.com/path/to/photo.jpg").
SameAs: A critical field – list all your official profile URLs here. This array should include your social media profiles (LinkedIn, Twitter/X, Instagram, Facebook, etc.), your Wikipedia page (if you have one), Wikidata entry, YouTube channel, or any other significant profile.
Make sure to validate your structured data (Google’s Structured Data Testing Tool or Rich Results Test can help) to fix any errors. The structured data essentially feeds Google’s Knowledge Graph with the facts about you in a standardized format. It’s your way of saying, “Hey Google, here’s exactly who I am and here are all the places online that confirm it.”
A template for Person schema might look like this (simplified):
JSON
<script type="application/ld+json">
{
"@context": "https://schema.org",
"@type": "Person",
"@id": "https://yourwebsite.com/about#person",
"name": "John Doe",
"description": "John Doe is an entrepreneur and author...",
"jobTitle": "Founder of Acme Inc.",
"worksFor": {
"@type": "Organization",
"name": "Acme Inc.",
"url": "https://acme.example.com"
},
"birthDate": "1980-05-15",
"image": "https://yourwebsite.com/images/john-doe.jpg",
"sameAs": [
"https://www.linkedin.com/in/johndoe",
"https://twitter.com/johndoe",
"https://en.wikipedia.org/wiki/John_Doe"
]
}
</script>
Include as much relevant info as possible – Schema.org has many Person properties (for example, award, alumniOf, birthPlace, etc.) that you can add if pertinent. The goal is to make your entity unambiguous. If another John Doe exists, your structured data + website should clarify which one you are (with your specific job, birthdate, etc.).
Note: Simply adding schema markup will not instantly produce a Knowledge Panel. It’s a necessary foundation, but Google typically needs more evidence. Think of structured data as planting the seed – you must still water it with authoritative sources and links.
Step 3: Build Authoritative Online Profiles (“Parasite” Platforms)
With your home base established, next expand your presence across the web. Google’s Knowledge Graph gathers information from a wide variety of sources, historically Wikipedia was key, but in recent years Google trusts hundreds of sources for entity data.
Your strategy is to “dominate your SERP” (search results page) by creating or claiming profiles on high-authority websites that rank for your name. This not only boosts your personal SEO, but also provides Google multiple trusted references about you.
Focus on getting listed on 20–30 trusted platforms that Google often cites. These include:
Knowledge Databases: Wikipedia (if possible) and Wikidata – these are gold-standard sources for Google. Wikidata is easier to get on than Wikipedia and feeds Google info too. Other examples: IMDb (for actors/filmmakers), Goodreads (for authors), MusicBrainz/Spotify (for musicians).
Professional Directories: Crunchbase (for entrepreneurs/startup founders), AngelList (startups), ZoomInfo or RocketReach (business databases), LinkedIn (a must-have for almost everyone).
Social Media: Create public profiles on all major platforms – LinkedIn, Facebook, Instagram, Twitter (X), YouTube, etc. Google considers these legitimate identity signals. Even if you primarily use one or two, having consistent profiles on others helps occupy your name’s results and signals your presence.
Business/Review Sites (if relevant): Google Business Profile (especially if you’re a public-facing professional or have a personal brand company), Yelp (for local businesses or public figures like consultants), Trustpilot (if you have a product or service), Glassdoor (for company leaders), etc. For authors or product creators, an Amazon Author Page or Seller profile can be useful.
Industry-Specific Platforms: Tailor to your field. Examples: GitHub (developers), Behance or Dribbble (designers), Academic profiles like Google Scholar (academics), Product Hunt or G2 (tech founders), SoundCloud (musicians/podcasters), Medium (thought leaders/bloggers), TED or SpeakerHub (speakers), etc.
For each profile, fill out all the biography/about sections thoroughly. Use these profiles to reinforce your narrative – the same core facts (job title, company, achievements) should appear on each. This broad “parasite SEO” approach leverages the authority of big sites to ensure that when someone Googles your name, the entire first page is filled with your controlled or vetted content. In fact, it’s ideal if eight or nine of the top 10 results for your name are your profiles on reputable sites. After you create the website, use an indexer to index your profiles.
Tip: If your name is common or shared with others, consider using a middle name/initial or qualification (e.g. “John Doe entrepreneur”) in bios to distinguish yourself. You might even brand yourself with a unique moniker. The key is consistency – Google won’t merge profiles if one says “John A. Doe” and another says “Johnny Doe” with conflicting info. Pick one version of your name and stick to it across platforms.
Step 4: Ensure Consistency Across the Web
As you build out profiles and listings, consistency is paramount. Small discrepancies (like one site listing you as “Marketing Consultant” and another as “Business Coach”) can confuse the Knowledge Graph. Audit all the information about you online and make sure the essential facts align everywhere:
Use the same job title or descriptor across profiles (or at least very similar wording).
Keep contact info uniform – if you list an office address or phone, use the same on each relevant site.
Ensure your company name is exact everywhere (e.g. don’t say “Acme” on one and “Acme, Inc.” on another without linking them).
Check factual info like your birthdate, education, or award names for accuracy across sources.
Update profiles that are outdated. If you got a promotion, won a new award, or changed companies, refresh all your bios to reflect that new info.
The idea is to help Google “consolidate your entity” by seeing matching signals. Inconsistent or conflicting data might lead Google to think they belong to different people or that it’s not confident about the facts. On the other hand, repetition of the same key points (even if phrased slightly differently) across dozens of sites screams “this is the real data”. You can even reuse a core bio paragraph on multiple profiles – there’s no SEO penalty for duplicate content in bios, and it reinforces your information.
Step 5: Link and Interlink All Your Profiles
Now that you’ve got profiles on many sites, it’s crucial to interconnect them. Google’s algorithms follow links to discover and verify connections between entities. There are two main ways to link your presence together:
Use the sameAs property in your structured data (as mentioned in Step 2) to list every important profile URL. Your website’s JSON-LD should be updated whenever you add a new significant profile. For instance, if you create a Crunchbase page or get a Wikipedia entry, add it to the sameAs array on your site. This explicitly tells Google “these pages all represent the same person (me).”
Cross-link on the profiles themselves. Most platforms let you add your website or other social links – take advantage of that. For example: put your official website URL in your Twitter and Instagram bios, link your LinkedIn and Twitter on each other, list your social media on your personal site’s contact page, etc. Many directories and bios also allow adding other URLs (Crunchbase has fields for Twitter, personal site, etc.). Fill these in. This creates a web of backlinks connecting all your profiles.
Also, within your own site content, you can link to these profiles. For instance, you might have a “Find me on” section that links out to your social media, or a press page that links to major news articles about you. These outbound links (especially from your entity home page) act as signals to Google that those pages are endorsed and relevant to your identity.
Interlinking does two things:
It helps Google’s crawlers navigate and see the relationships (e.g. it finds your Instagram via your website and sees it’s the same person).
It provides evidence of control – if all these profiles link back to your official site or each other, it’s more convincing that they belong to you (and aren’t about a namesake).
In summary, create a tight-knit network of your online properties. Think of each profile or mention as a piece of a puzzle – linking them helps Google assemble the full picture.
Step 6: Boost Credibility with Press and Coverage
While active profiles and social accounts are necessary, one of the biggest factors for triggering a Knowledge Panel is appearing in trusted publications. Google’s Knowledge Graph heavily values independent, authoritative coverage – such as news articles, press releases, interviews, or features about you on high-quality sites. These validate your notability and provide rich information for Google to scrape.
Here’s how to leverage press for your Knowledge Panel goals:
Secure press coverage or interviews in reputable outlets (especially those indexed in Google News). Aim for at least a handful of full-length articles focused on you or your business on sites with high authority. For example, an interview in an industry magazine, a profile piece on a popular blog, or a news item about a project launch. One experienced growth hacker suggests that about 7 or more significant news articles on high-authority, Google News-approved sites (DA 80+) dramatically improves your chances. The more quality press you have, the more “proof” of your prominence.
Issue press releases for major announcements (new product, speaking at an event, publishing a book, etc.). Distribute them via reputable wire services (PR Newswire, Business Wire) that many outlets republish. In your press releases, include a boilerplate “About [You]” section with the key facts (who you are, title, company, founded when, etc.) – this ensures those facts appear in multiple places. The first lines of the release should also clearly state your identity and why you’re notable.
Podcasts & videos: Appear on podcasts or YouTube interviews in your field. Google transcribes and understands some audio/video content now, and at minimum the descriptions (which you can control) can reinforce your story. If the podcast is on a known platform (Spotify, Apple) it adds to your footprint.
Citations in third-party content: Besides dedicated articles about you, getting mentioned in others’ content helps. For example, being quoted in a high-profile article (“Jane Doe, CEO of XYZ, says...”) or guest posting on popular blogs (with a bio line about you).
When you get media coverage, link it on your site and consider adding it to your structured data. You can use schema properties like sameAs or even subjectOf to reference significant articles. At the very least, listing “As seen in [Publication]” with links on your site both impresses visitors and signals Google to associate those sources with you.
Keep in mind, quality outweighs quantity. A few strong pieces on respected websites will do more for your Knowledge Panel than dozens of low-tier mentions. Also, any content that provides context (your age, profession, etc.) helps fill in Knowledge Panel details. Google might even cite those sources in the panel (often a little clickable source icon appears).
Step 7: Monitor Google’s Knowledge Graph Presence
As you implement the steps above, periodically check if Google has started to recognize you as an entity. One way to do this is by using Google’s Knowledge Graph Search API (or free tools that utilize it). This API can reveal if an entity with your name exists in Google’s Knowledge Graph database, and often provides a confidence score or “relevance” metric. A high score indicates Google has strong understanding of that entity (for example, famous individuals often have scores in the thousands).
However, even a low score (or none at all) doesn’t necessarily mean you can’t get a panel – people have reported having a Knowledge Panel live on Search even when the API confidence is low or the entity isn’t directly findable via the API. So use this as a diagnostic tool, not a strict prerequisite.
To check:
Use the official API if you’re technical (requires an API key and query to the endpoint). Google’s documentation explains how to query by name and filter for Person or Organization types.
Or use third-party tools like Kalicube’s Knowledge Graph Explorer or Carl Hendy’s Knowledge Graph Search which provide a user-friendly interface. Input your name and see if an entity comes up.
If you get a result, note the KG Entity ID (kgmid) – it’s usually a string like /m/0abc123. This ID, if found, is the unique identifier Google assigns your entity. You can actually visit a special Google URL with that ID (https://google.com/search?kgmid=YOUR-ID) to see a preview of the entity’s info. This often shows the Knowledge Panel as Google’s “internal” view, which might update before the public search results do.
Don’t worry if you’re not in the Knowledge Graph API initially. Keep building your online presence. It might be that Google’s web search surfaces a Knowledge Panel even before the Graph API database catches up. The ultimate test is simple: search your name on Google regularly. Use incognito mode and try both on desktop and mobile. If you start seeing a Knowledge Panel appear on the right side, congratulations – you’ve triggered one!
Step 8: Claim and Manage Your Knowledge Panel
When your Knowledge Panel finally appears, your job isn’t over – you’ll want to claim it as the official representative. Claiming the panel gives you limited control, such as the ability to suggest edits to certain fields and to have your own verified account associated with the panel.
To claim your panel: click the “Claim this knowledge panel” or “Own this knowledge panel?” link usually shown at the bottom of your panel on Google. This will initiate a verification process. Generally, Google will have you sign in with an account that is associated with the entity – for individuals, this could be an account that has access to your official website in Google Search Console, or your official YouTube/Twitter (Google may offer multiple options for verification).
You’ll then need to prove your identity. As of recent processes, Google often asks for:
Government-issued ID (and sometimes a live selfie holding it) to verify you are who you claim.
Proof that you officially represent the entity (for yourself this is straightforward, for a company or someone else you might need additional documentation like a letter of authority).
Your connection to the entity’s online presence: Google may ask you to sign in to official social media accounts or provide links to them as evidence.
Complete the verification form with all required info. Once submitted, Google will review the request (it can take a few days to a couple of weeks). Upon approval, your panel is marked as claimed, and you’ll typically get access to a Google account dashboard where you can suggest edits to the panel info.
Claiming is important because it lets you fix any inaccuracies in your panel. For example, if the description or title is wrong, or if an image is outdated, you can request changes. Google will ask for justification and proof for each edit. If you provide solid sources, changes are often approved within a few days. Common editable fields include the description (often taken from Wikipedia or other bios), your title/profession, and social profile links.
Maintaining Your Knowledge Panel Long-Term
Earning a Knowledge Panel is an ongoing process. To maintain that trust signal in Google’s eyes, keep up the good work on your overall online presence:
Keep information consistent and updated on all sources. If you achieve something new (award, new job, new publication), add it to your website and profiles. Google will catch on to new significant info, especially if covered in news or reflected on major sites.
Monitor for duplicates or confusion. If someone with a similar name starts gaining traction, you might see strange data mix into your panel. In such cases, strengthen your own signals (more schema, more profile links) and consider reaching out via Google’s feedback to correct any mix-ups. In some instances, people have had two panels (e.g., one auto-generated from one source and another from a different source); Google allows you to request merging of panels via the feedback form or support channels if that happens.
Continue building E-E-A-T: In SEO terms, that’s Experience, Expertise, Authoritativeness, Trustworthiness. The more you appear in expert contexts (speaking at events, quoted in articles, publishing high-quality content), the stronger your entity becomes. Google’s understanding of entities evolves – it now draws from many sources, so becoming a thought leader in your domain will naturally reinforce your Knowledge Graph presence.
Leverage the panel: Now that you have it, use it in marketing. For instance, people may start seeing the panel and trust you more – you can mention “Google me to see my profile” in pitches or link to the Knowledge Panel (using the kgmid link) in digital resumes. It’s a prestige symbol, so enjoy the benefits, but don’t rely on it alone for credibility.
In summary, creating a personal Google Knowledge Panel is about establishing yourself as a distinct, trustworthy entity online. You achieve this by: (1) consolidating your key info on a home base with proper schema, (2) expanding to authoritative profiles and sources (to essentially “claim” your first-page results), (3) keeping all those references consistent and interlinked, and (4) earning Google’s confidence through external validation like press and third-party mentions.
Do all of the above, and in time, Google’s algorithms should reward you with that little information box of your own. And once it appears, claim it and keep nurturing your presence so it remains a lasting asset for your personal brand.
We wrote this guide because we believe in transparency. You should know exactly what goes into getting a Knowledge Panel. And now that you do, you can decide: invest months of your own time and take on the risk yourself, or let us handle it with a guarantee.
Ready to skip the hassle? Book a Strategy Call.

Abhay Jain

Founder
Latest posts
Discover other pieces of writing in our blog


